
Update (30 April 2021): Made the headline more descriptive.
Update (12 Aug. 2021): Added sections on how to get additional/older benefit payment history and how to send documents securely via Signal. Shortened the title and changed the image for the post.
Update (6 Feb. 2022): On why the information on the portal is NOT accurate, see Unemployment delays, part 9.
The Department has been announcing its new unemployment portal.

The problem with this new portal is that basic functionality and information remains unchanged. All that has happened is that the Department has replaced a few menu commands with some new icons. The confusing messages about claim status, the lack of access to the legal documents that decide claim status like benefit year calculations remain, and the multiple layers and clicks to find key information and documents that might or might not be available are still present. Furthermore, there is still no instruction or guidance from the Department about how to navigate the portal to accomplish vital tasks, like appealing an initial determination.
One of the first problems claimants will notice is that not all commands/tools are available to all claimants. For instance, the Department is advertising how claimants can now upload documents. But, that feature is only available to certain claimants when the Department itself decides that those claimants need that ability. The portal for the PUA claimant shown below lacks the document upload tool.

Looking for issues and determinations leads to a confusing and incomplete presentation in which only the current issues and determinations are listed. Clicking on the Determinations button

takes claimants to a Determinations and Appeals page:
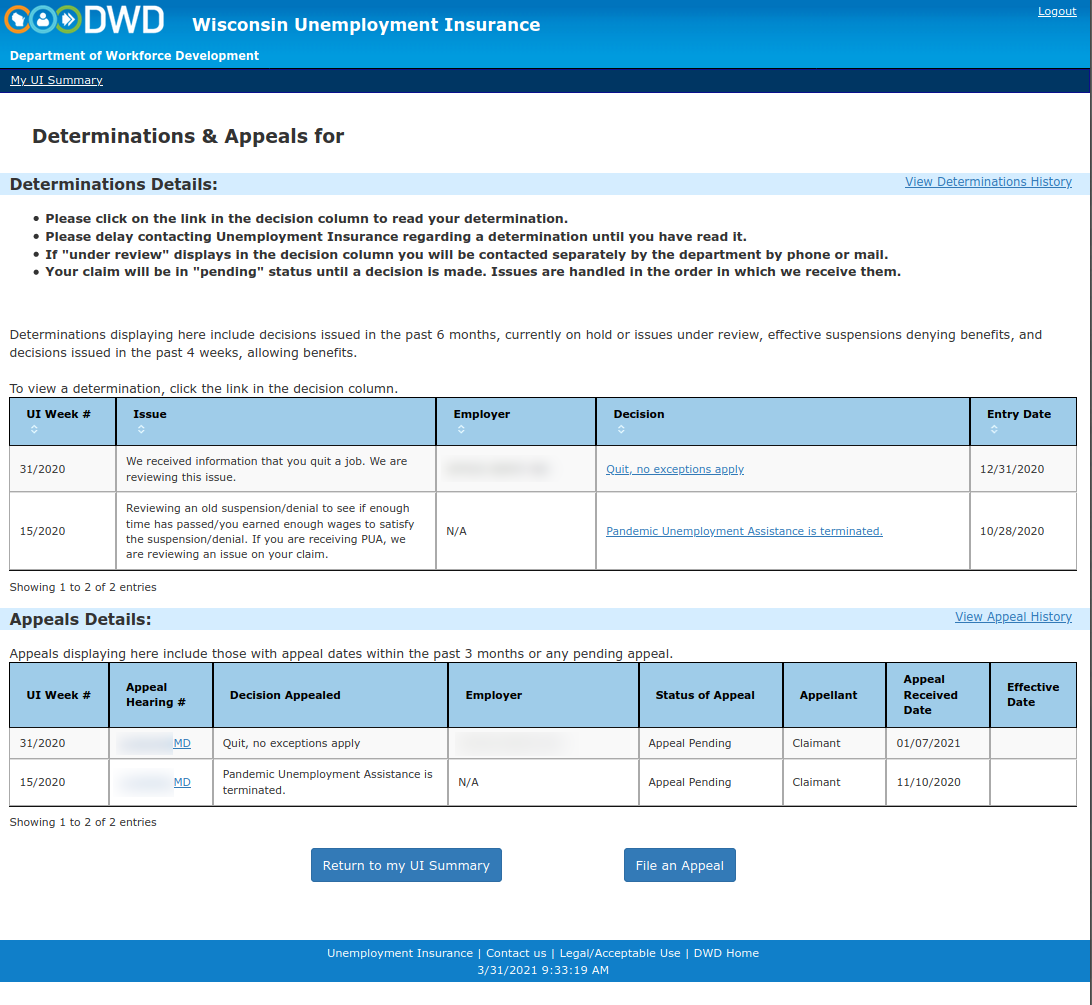
This listing, however, only provides current determinations and appeals. Determinations that have NOT been appealed but which are still denying benefits are NOT listed here.
The issue listed at the top for each of these determinations, moreover, do NOT at all describe the initial determinations themselves.
Furthermore, there may be other determinations for which no initial determination was issued. Click on View Determinations History to see what other determinations might be connected to you.

Here, more determinations connected to you may appear:

In this screenshot, there are now four determinations rather than just the two that have been appealed.
The one for the week 26/2019 indicates that a quit in 2019 is NOT disqualifying because the claimant subsequently earned enough wages to satisfy any disqualification connected to that quit. There is no initial determination connected to this listing. And, there are two for week 15/2020: one disqualifying the claimant issued on 10/28/2020 (which per the Determinations screen above we can see that the claimant has appealed) and another issued on 7/24/2020 finding the claimant eligible for PUA benefits. Finally, there is a determination for week 31/2020 that was issued on 12/31/2020 finding that the claimant quit a job and so is disqualified from receiving unemployment benefits (per the Determinations screen above, we can see that this determination also was appealed).
These are NOT all the documents available to this claimant, however. The Document History option detailed below remains the only viable option for seeing all the documents connected to an unemployment claim.
The appeals option is problematic as well. Selecting Appeals

will only show the determinations that can still be appealed. Determinations for which an appeal would be late are NOT listed.

To find an appeal online for an older initial determination, claimants have to click on the Find Determination button, enter the number of the initial determination they want to appeal, and then click on still another Find Determination button.

The initial determination number is the number in the upper left corner of initial determination.
Since most claimants do not track these initial determination numbers, this requirement for an initial determination number for finding an old initial determination creates a major roadblock for filing any late appeals.
Finally, the claim status messages remain as confusing as ever. These messages are generated when a Department staffer does anything involving an unemployment claim. They do NOT reflect the actual legal status of the claim.

Claimants should continue to ignore these messages because they often mean nothing and can actually be misleading.
So, the portal’s usefulness remains limited to two tasks: a claimant’s document history and a claimant’s benefit payment history. Here is how those tasks work with the new portal.
Document history
Your Document History will list some of the important documents connected to your claim, and it provides a central location for finding those documents on your portal.

To get to your Document History, follow these steps.
1. Click on the Menu button on the upper-right corner of the screen.

2. After clicking on Menu, you will see a screen similar to the following:

3. Click on the Document History option.

4. The Document History screen is then revealed.
5. Click on the View button next to each document to see that specific document. Notice that initial determinations, appeals, appeal confirmations, and telephone hearing packets — labeled as Telephone Instructions — are available here.
Benefit payment history (updated 12 Aug. 2021)
In contrast to the document history process, claimants’ access to their benefit payment history has been improved.
1. Click on the Print Benefit Statements icon.

2. The following screen is presented to you.

3. Make sure the checkbox By choosing to create a formal summary, I acknowledge that it will include personal infromation such as my name and Social Security Number is checked and that Create a PDF document is selected.

4. Click on the Create Document button.
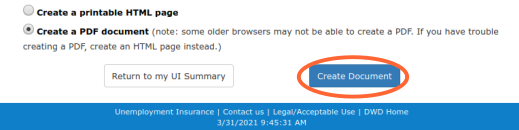
5. A PDF printout of your benefit claim and payment history will appear on your screen or be prompted to be downloaded.
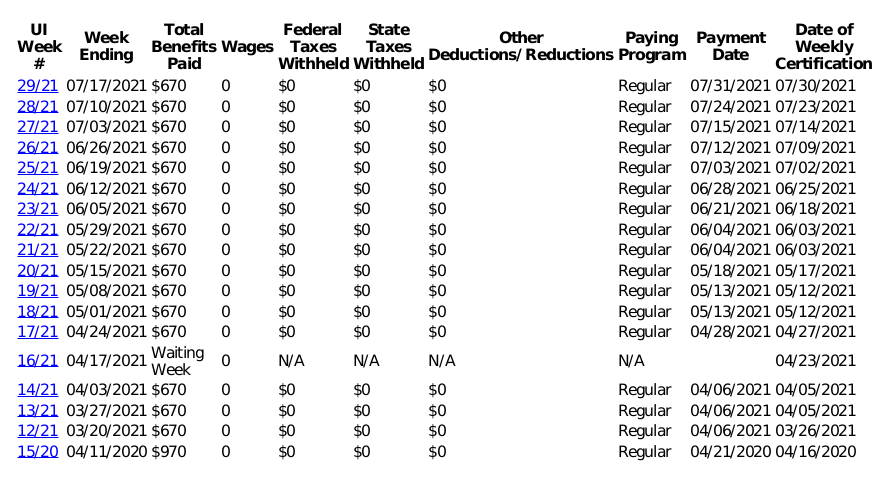
The problem with these benefit year printouts is that they are limited to a calendar year going back 12 months from the current date. Because many of the issues now being “decided” are more than a year old, the benefit payment history available here in this PDF fails to include the actual weeks when you first started claiming benefits.
To get those earlier weeks, follow these directions.
1. Click on My UI Summary.

2. At the next screen, click on the More Info link.

3. At the “Benefit Payment History” screen, change the time period to either All Payments or Calendar, where you select the time period for the payments.

4. Your benefit payment history for the time period selected will then appear
5. To save a copy of this screen, take a screen snapshot.
- Macintosh computers: Press the
CMDandShiftand3keys to save the image into a file on your Desktop. Or, press theCMDandShiftand4keys to draw a rectangle around the portion of the screen you want to save. - Windows computers: Press
AltandPrtScnkeys to save a PNG file of the current window inside your Pictures folder. Update 3 Feb. 2022: On older Windows computers, the screenshot is stored in memory. So, you will need to ‘Paste’ the screenshot into a word processor document or an e-mail message by getting a new message or document running and then selectingEdit | Pasteor by pressingCtrl-V. - Apple iPhones: On older iPhones, press both the
HomeandTop/Powerbuttons at the same time to save a PNG picture in your photos library. On newer iPhones that lack a home button, press both theVolume UpandTop/Powerbuttons at the same time to save a PNG picture in your photos library. - Newer Android phones: Press either the
PowerandVolume Downbuttons at the same time or press and hold thePowerbutton for a few seconds before tapping on the screen. Look for the screenshot in your photos library.
Sending a PDF document via e-mail
Do NOT send any PDF documents via e-mail message that have confidential information like social security numbers or bank account information. Initial claims/applications and telephone hearing packets/instructions almost always have raw social security numbers visible to anyone.
- On a smart phone: when viewing the PDF, click on the share button and then select the e-mail option. Make sure to then write in an e-mail address and a subject.
- On a desktop: download the PDF document, start up your e-mail program, and then attach the PDF to a new e-mail address that you are sending to someone (make sure to fill out a subject and to whom the message is being sent).
Sending a document securely via Signal — added 12 Aug. 2021
For those documents that have confidential information — initial claims, hearing packets (labeled telephone instructions on the portal) — Signal provides a way.
You first need to set Signal up on an Apple or Android smartphone by linking the Signal app on that smartphone to your phone number. Once set up, you can then use Signal to send secure documents to another Signal user — which I am under my phone number — on your smart phone or your computer: Mac, Windows, and even Linux.
To send a file on your smartphone via Signal, follow these steps.
1. Get the file actual file showing on your screen.
2. Then click on the three dots that appear on the screen or press a finger on the document and hold until the sharing screen appears.

3. A sharing window should appear. Look for and press on the Signal icon or look for an option to send or share via Signal and press on that option.

4. You are then taken to the Signal app where you need to select a recipient and then to press the send button.

5. The file is sent!
With Signal, you can send documents that have your social security number securely to a trusted person, like your legal representative.

Pingback: How to navigate Wisconsin’s unemployment portal | Wisconsin Unemployment